


Build Your First Resizable Front Panel
- 7 sept. 2017
- 3 min de lecture
It took me some time to figure out what my first post would be about. Then I wondered: "What do people more likely ignore about LabVIEW?" My first bet was UI design. I still ignore LOTS of things about it, but let's face it: it is easy to recognize a LabVIEW front panel when you get to see one on TV, on the internet, on a video. They are grey, have very noticeable controls (we'll see why you should definitely forget about the modern and silver palettes)... It can be very convenient for NI to advertise neat applications but this is as far as the pros list can go. So this post title says it all: in 5 minutes, you'll be able to build a sober yet powerful and flexible front panel, and it will properly RESIZE!

A game of panes and splitters
First, you have to forget about the Window Size category in the VI Properties (File>>VI Properties).
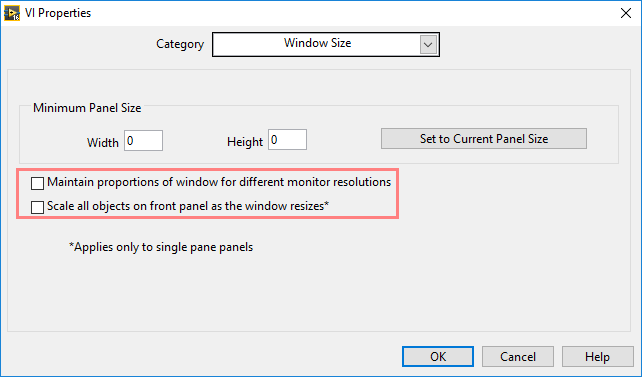
These options won't work miracles, as you may already have noticed. The front panel is where the magic happens, and splitters will be your magic wand!
Splitters exist in all the palettes (except silver), can be horizontal or vertical, and, as the name suggests, are used to split your front panel into independent panes. A simple application often divide into 4 parts:
- a header with the application name, logo, and possibly a menu (resizes horizontally)
- a status bar at the bottom which usually contains the status information, a tooltip, a progress bar, or a log (resizes horizontally)
- a list, listbox, menu bar or a collection of buttons on the left side (resizes vertically)
- the middle part, the core view of the application (resizes in both directions)
Start creating this layout using splitters. Use the classic palette, as the design is less intrusive.

Fit and Scale
At that point, resizing should already work quite well, but the status bar seems to remain stubborn. Blame the bottom splitter settings.

Change the splitter sizing by right-clicking on the splitter, and change it to stick to bottom. All the panes now resize properly (good for you!) Of course there is no content in your UI yet but you can tell the structure is now reliable.
Take some more time to carefully explore the splitter contextual menu, it is full of gems. You can access its adjoining panes settings, lock the splitter, or create a reference on your splitter to edit its behavior programmatically (color, position...) Same for all the scroll bars—their contextual menu enables you to set the bars visibility, and the way the elements in the pane resize, if they are allowed to.
Now it's time to populate the panes. Let's keep it simple, I only have 5 minutes! So, please add:
- a simple text (3rd item in the classic string palette) in the top pane: edit the label, then hide it. Right-click the control and select Fit Control to Pane. Change the color using the tools palette. Now change the font, size and color and name your first beautiful UI.
- a system listbox in the left pane: edit the label and hide it. Make it fit to the pane too. Add a few items to the listbox so that you can play with it at run-time. Right-click it and select Highlight Entire Row in the Selection Mode menu. Make the column header visible.
- a chart in the middle pane (I'd recommend the UI Controls Suite: System Controls 2.0 chart which can be installed as a free add-on using the VI Package Manager, so give it a try!) Make it fit to its pane just like the previous ones.
- a simple text in the bottom pane: customize it as you like, and make it fit to its pane too.
Finally, tune the splitters size and color (it's sometimes nice to paint the splitter in the color of one of its adjoining pane background).

Hopefully you got it right by now: resizing comes with panes. It may seem cumbersome, but I see one major benefit to it: with that rule of thumb (one pane = one resizable control), you shoud limit the number of controls in a single VI. And that's good for modularity/coupling/cohesion.
Try your new UI. Maximize it, resize it and be proud of your first resizable UI (save it!)

If you really want a final touch, you can set the panes (top, bottom, middle) to Scale Objects while Resizing, from the panes menu (if there is no more scroll bar, you can still access a pane settings from one of its splitters).
Although this option is more CPU-intensive, I think it really looks better on screen.
Commentaires